Lutron Integration Guide
Welcome to the Lutron Integration Guide for CasaTunes. Your CasaTunes music system includes built-in support for Lutron RadioRa2 and Homeworks lighting systems, allowing customers the option to control their CasaTunes music using their Lutron wireless pico controllers, keypads, and Lutron timer events.
Simply put, you configure a CasaTunes Action in response to a button press, or a Lutron timer event. The CasaTunes Actions available include: Powering a room on or off, toggling the power for a room, moving to the previous or next track, switching to the previous or next source, playing the previous or next playlist, pausing or playing the music, toggling between pausing and playing the music, turning off all rooms, and turning the volume up or down.
Each CasaTunes Action can include various settings you can customize. For example, when you select the Power On action, you must select the room to turn on, and optionally the initial room volume, the source to use, and a specific playlist.
Pre-requisites
- Lutron setup is currently only available using the CasaTunes iOS App v8.87 or later
- You must be running CasaTunes v5.00.170714 or later
- You should configure you main Lutron controller with a static IP address. Your Lutron controller must be network accessible by your CasaTunes music server. In most cases, this is not an issue because both the Lutron controller and CasaTunes music server are connected to the same network segment. You will need to provide the IP Address of your Lutron controller when you configure your Lutron Settings in the CasaTunes App.
- We recommend creating a dedicated Telnet login account for CasaTunes. We recommend using “CasaTunes” for the username, making it clear this account is being used by CasaTunes. You will need to enter the Telnet login username and password when configuring your Lutron Settings in the CasaTunes App.
- We recommend Lutron RadioRa and Homeworks version 11.5 or later
Setup using the CasaTunes iOS App
- Open the CasaTunes iOS App
- Press the reveal button to display the Menu
- Select “Lutron Settings”
- Select Enable Lutron
- Enter the IP Address of your Lutron controller (pre-requisite #3 above)
- Enter the Telnet login username and password (pre-requisite #4 above)
- Press on “Verify Credentials” and ensure the credentials are successfully verified (CasaTunes will display a green check mark if the credentials are valid, or a red X otherwise)
- If this is the first time you enabled Lutron in CasaTunes, it could take a while for CasaTunes to login to your Lutron Controller and download the configuration database for your home
- Select the “Triggers” item
- Select “Add new trigger” and browse your home to select the button or timer event you want to use to trigger a CasaTunes Action
- Configure the “ACTION SETTINGS”
- The settings to be configured will depend on the CasaTunes Action selected
- Select “Save” to save the trigger you have just configured, or “Cancel” if you want to discard the newly created trigger
- Repeat steps 10 thru 13 for each button and timer event you want to configure
- To delete a trigger, press the “Edit” button
Example: Using a Lutron Audio Pico Wireless Controller
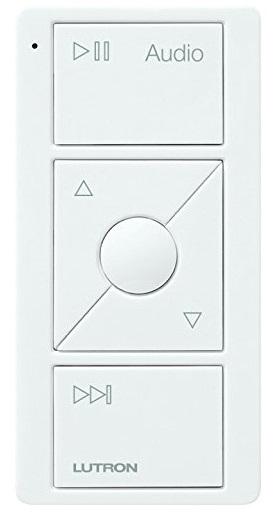
Figure 1: Lutron Audio Pico Wireless
The Lutron audio pico wireless controller is a simple, yet powerful control solution for your customers, especially for those customers who are less technical. This simple control device has 5 buttons (see Figure 1), including: Pause/Play, Volume Up, Volume Down, Favorite (center button), and Next Track buttons.
When configuring this device for CasaTunes, we recommend you configure the Play/Pause button to trigger the CasaTunes “Toggle Power” Action, the volume up/down buttons to trigger the CasaTunes “Volume Up“ and “Volume Down” actions, the favorite button to trigger the CasaTunes “Next Playlist” action, and the next track button to trigger the CasaTunes “Next Track” action.
Watch the following quick tutorial to learn how to integrate a Lutron Audio Pico Wireless Controller and control your CasaTunes music.